Which linux directory to back up #
- /etc
- /home
- /root
- /var
- /usr/local/bin and sbin
- /srv
Note: If there are any media mount points in the system such as ‘/mnt’ and ‘/media’, they should be excluded to avoid infinite loop
Also helpful to list down the names of packages installed on your system
dpkg --get-selections > package_list.txt
Backup command options #
tar, rsync
Which one to choose? pros and cons?
TLDR: rsync is good if you want the files to be directly accessible, tar is fine if you don’t.
Whether transferring files locally or remotely, rsync first creates a file-list containing information (by default, it is the file size and last modification timestamp) which will then be used to determine if a file needs to be constructed. The first backup with rsync will be slow because all files are copied. Subsequently only the changed files are copied, and they can be compressed during the copy.
tar is an archive utility, and although it does have option for incremental backup, it seems more work have to be done on my side.
On first run, tar generates a sizable file, potentially compressed (using the -g gzip flag), containing all the backed-up files. This is done much faster than rsync because tar file formats are simple sequences of file headers followed by file data. Writing out a new file header is simply appending a record to the output file. Writing out file data is simply appending more records to the output file.
(header1)(header2)(header3)....(data1)(data2)(data3)...
This is a very efficient thing to do, but terrible for random access of data in the archive.
Subsequent tar incremental backups produce new files exclusively for the modified files, specifying any deleted files as well.
In contrast, rsync starts by maintaining an uncompressed duplicate of the source directory’s exact tree and files in a second mirror directory etc. Basically doing extra organisation stuff on top of doing what tar does. This means rsync first run will be much slower compared to tar, but you can access your files much faster. With each incremental backup (-B flag), it consistently maintains a mirrored copy of the source, preserving all altered files (both modified and deleted) in a separate directory organized by date.
Each has its own way to do things and depends on your need and situation, one is probably more suitable than the other, e.g. few large files vs thousands of small files, or how readily accessible you want your archive to be, or your production environment has a lot of changes or not etc.
Why I chose rsync for now?
My blog consists of a small number of small files.
I don’t have to keep historical versions of my blog and server yet.
And I want my data to be as accessible as possible for now.
The rsync protocol can easily be used for backups, only transferring files that have changed since the last backup, so it’s easy on the network and quick.
How to restore #
If you wish to restore a backup, use the same rsync command that was executed but with the source and destination reversed.
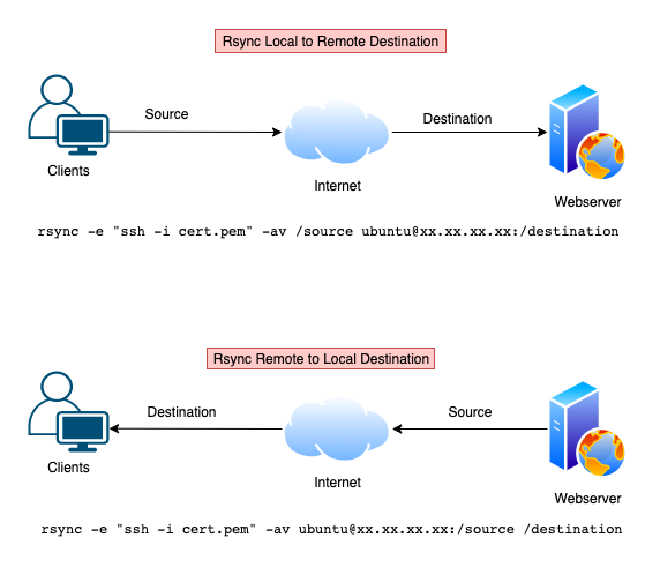
Backing up my blog to local server with rsync #
The rsync command is:
rsync -avz $USER@$HOST:/remote/blog/dir /local/backup/dir
in which:
-a: archive mode. Archive mode is a quick way to tell rsync you want recursion(directory structure) and to preserve almost everything. In this case, everything means permissions, ownership, file modification and access times, and so on.
-v: I want to see what’s happening under the hood
-z: let’s compress the data for faster transfer & lower bandwidth
-P: keep partially transferred file and display progress
--delete: Deletes any directories or files in the destination directory that do not exist in the source directory. Use with caution.
Note: when running the first time, we can add -n behind the -avxP to do a dry run for simulation if you are using Rsync for the first time. Remove it if the command runs as expected and run the command without -n to backup.
Syncing blog dir in local server with online blog #
rsync -avz --delete -e ssh /local/backup/dir $USER@$HOST:/remote/blog/dir
in which
-e ssh: tells rsync to use SSH
Automate it with cron #
-
Create ‘blog-bak.sh’ file containing the rsync command (see update section below for full version)
-
Set permission to 755 to be executable by cron job
chmod 755 blog-bak.sh
- Edit crontab file find the crontab file in /etc/crontab. This blog post goes deeper in explaining the options and when to use which explain the stars (min-hour-day-month-DoW)
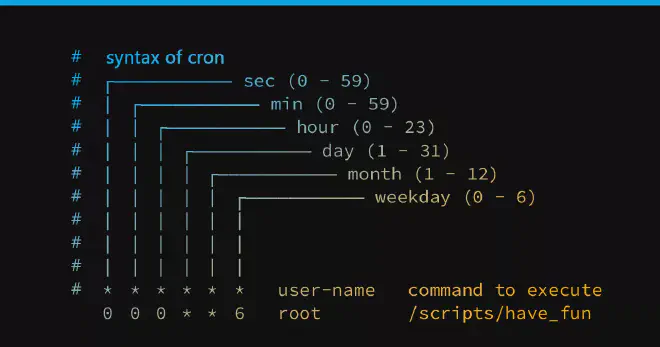
A nifty website to check when your cron jobs run: https://crontab.guru
Update 1/3: apparently the best practice is to not edit /etc/crontab directly but create a file in /etc/cron.d/ directory containing the command
Cron job as root or as user? which one to choose? #
The decision to run a cron job as the root user or any other user depends on what actions we need to perform in the script.
- Root User: Pros: Can perform all possible tasks, including those that require administrative privileges like accessing system files, updating software packages etc.
Cons: If a task is misconfigured or compromised, it could lead to serious security issues, such as allowing a user to execute commands with root permissions. Also, running a script as the root can make your system more vulnerable to attacks.
- Regular User: Pros: Less likely to cause system-wide damage if a cron job is misconfigured or compromised. It’s easier to track and control what a particular user does in the system logs.
Cons: Depending on the task, it may not be able to perform all possible tasks due to lack of necessary privileges.
In this case of backing up our data daily, as an ordinary user, this can easily be done with a script that copies files from your home directory to another location (like a remote server). But if the backup involves actions like creating a new file system or mounting volumes, you would require root permissions and it’s more secure to run as the root user.
How to make sure cron jobs are running as scheduled and actually work? #
Check syslog
sudo grep -a blog-bak.sh /var/log/syslog
Test running using cronitor
Or use shell script by daladim
This is good and simple, for now.
Update 1/3: adding tar as backup method #
Learning through tinkering with the (production) system means it is more prone to mistakes and accidents. I might screw things up and might not even know where to fix. rsync whilte maintaining a copy of the running system doesn’t allow me to rollback to pre-mistake version. That’s why I changed my mind and thought I need tar for version-control purpose.
This time knowing a bit better, I created a decent backup shell script with both rsync and tar with logging function in there as well:
#!/bin/bash

# Get current date and time for backup filename
current_date=$(date +%Y-%m-%d)

# Define directories to backup & destination
dirs=("/etc" "/home" "/root" "/var" "/usr/local/bin" "/usr/local/sbin" "/srv" "/lib/modules")
backup_filename="backup_$(date +"%Y-%m-%d_%H-%M-%S").tar.gz"
backup_dest="<path-to-backup-dir>"
logfile="${backup_dir}rsync-${current_date}.log"

# Number of older backups to keep
max_backups=7

# Check if backup directory exists, create if not
if [ ! -d "$backup_dest" ]; then
  mkdir "$backup_dest"
  echo "Created backup directory: $backup_dest"
fi

# Create log file if it doesn't exist
if [ ! -e "${logfile}" ] ; then
    touch "${logfile}"
fi

# Create list of installed package at home dir
rm package-list-*.txt
dnf list installed > "package-list-${current_date}.txt"
chown pers:pers "package-list-${current_date}.txt"
chmod 644 "package-list-${current_date}.txt"

# Backup with rsync
for dir in ${dirs[@]}; do
  echo "Backing up $dir..." >> "${logfile}"
  rsync -arRv --progress --delete "$dir" "$backup_dest" >> "${logfile}"
done

# Create separate backup tar for version control
tar --directory="/" --exclude "/mnt" -czvf "$backup_dest/tar/$backup_filename" "$dirs"

# Remove older backups & logfile
find "$backup_dest/tar" -type f -name "*.tar.gz" -mtime +$max_backups -delete
find "$backup_dest" -type f -name "*.log" -mtime +$max_backups -delete

# Inform the user about the backup completion
echo "Backup completed: $backup_filename"

exit 0